
OverTheWire Bandit Challenges
Bandit is the set of beginner Linux challenges at OverTheWire. These are great to get you learning the Linux command line and the basic skills you will need for CTF’s / penetration testing. These following writeups are not the answers directly, but more the process to get the answer (although sometimes the answers will be in the screenshots).
You SHOULD be trying these challenges yourself. Writeups and guides like this should be your last resort if you need a hint.
If you want more depth and explanation on the Bandit challenges, you can see Jack Halons solutions here.
We can connect to the bandit labs with:

And enter the given password for the level (which we usually find on the previous level). The current level password is always in/etc/bandit_pass/*current bandit user*.
Bandit 1
For a file name with a -, this is a special character so we need to provide the full path name with ./-.
Bandit 2
For a file name with spaces we can either tab autocomplete or use double quotes around the whole name or escape the spaces with / e.g. “this/ is/ a/ filename”.
Bandit 3
To come…
Bandit 4
To come…
Bandit 5
du is the disk usage command. Good for finding file sizes and recursing through directories. Use flags -h and -a for human readable and more appropriate file sizes.
Bandit 6
We can search for permissions based on user or group with the find command e.g. find *directory* -user *username* -group *group name*.
Bandit 7
We can use grep -e to find a line with a word in it.
Bandit 8
If we want to find a unique line of text in a file, we can sort with sort and then pipe that output to a uniq -u command.
Bandit 9
Extracting our password from a binary file can be done with strings *filename* | grep -e *what we are searching for*.
Bandit 10
Decoding from base64 to ASCII is done by base64 -d *file*.
Bandit 11
To shift lower and uppercase letters using a ROT13 cipher we can use cat *file name* | tr 'A-Za-z' 'N-ZA-Mn-za-m' which will translate our a-zto n-zand a-m.
Bandit 12
For hex dumps and decompressing files, we can use xxd -r to reverse our hex dump to a binary file (and call it something.bin). If we inspect the file with file we see that it was compressed with gzip.
This file has a lot of compressions so we need to reverse the compressions. We can reverse gzip compressions with zcat and bzip2 files can be reversed with bzcat. tar compressions can be reversed with the tar command. tar -xO extracts the files and prints the contents to screen. We can either create a new file in the tmp folder or pipe the outputs into each other.
A helpful tip is to pipe the output to file – which will take the info from the pipe and use it in the file command so we can see what decompression method to use next.
So, with piping rather than creating new files our command looks like: 
Bandit 13
We are given a private key for the bandit 14 login. We need to take this key and use it to login on our own root terminal. If we create an exact copy of the key document and change the permissions to 600 (owner can read and write) we can use the ssh -i command to insert the key file and log in as normal.

Here is a better explanation about file permissions from stack overflow:
$ chmod [owner][group][global] *testfile*Now what do we put in the spaces in the brackets to denote what permissions? Permissions types are given a number
4for read,2for write, and1for execute. The file permissions are a TOTAL of all the permissions that we would like that object to have. For example, if I want to give owner full access and everyone in the group read and write access and everyone else read access I would enter the following:read (4) + write (2) + execute (1) = Full (7)
read (4) + write (2) = rw (6)
read (4) = 4
$ chmod 764 *testfile*
Bandit 14
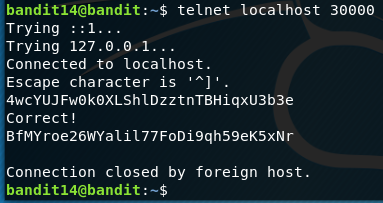
We need to get the password for bandit 14 and telnet to port 30000 on localhost, submit the password and viola.
Bandit 15
Here we need to connect to the port via openssl, and then submit the Bandit 15 password.

A lot of diagnostic output here. Note the required -ign_eof flag. This is because our pass begins with a B which seems to terminate the connection (same with a pass beginning with a B or beginning or ending with a q).
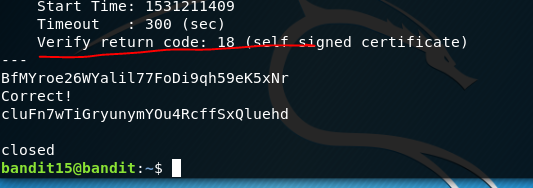
There we have to put the Bandit 15 password in and we get the pass for the next challenge.
Bandit 16
For Bandit 16 we have a similar challenge but we must use the nmap command to scan the ports first to find which ones speak SSL before using our openssl command like in Bandit 15.
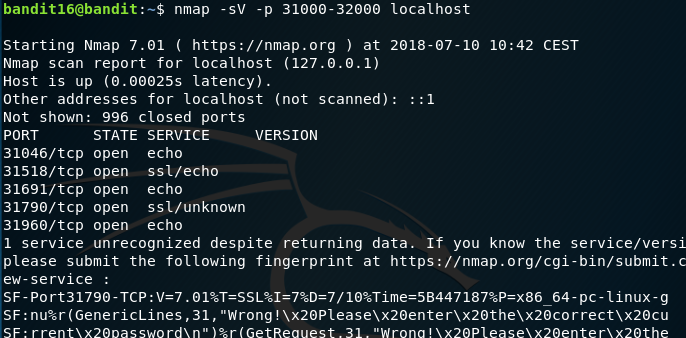
As we can see, it’s port 31790 as it is running ssl but will not echo our request. And that big ugly string at the bottom is just telling us that the password entered is wrong (from nmap scanning the port). We just need to find our password in etc/bandit_passwords/bandit16 and use our openssl command.

And we get another private key, which we can use to log into Bandit 17.
Bandit 17
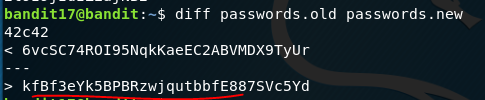
Here we just have to do a diff between the two files and it will output the change in passwords.new which is where the password is for Bandit 18.
Bandit 18
We are logged out as soon as we log in but this command allows us to get to the home directory.
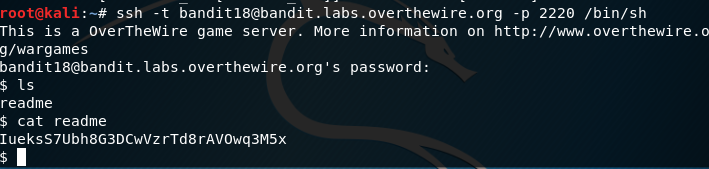
This seems to provide a shell in a pseudo terminal for us to access the readme file which we can then see the password. We can also tell the shell to ignore the bashrc file with /bin/bash --norc and this will achieve the same thing.
Bandit 19
We have a setuid program which we need to run. We can do this like running a script, with ./filename
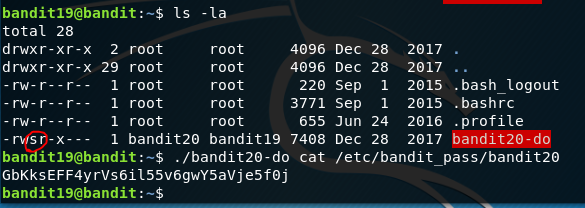
We have our bandit20-do with the setuid bit set on that file which means it will run with the permissions of the owner rather than the user. This program will therefore run as user bandit20.
We can thus run cat with the password file and it tells us where as user bandit19 this was forbidden.
Bandit 20
This challenge involves setting up a listener port and using the script to send and check the password of Bandit20 to get the bandit21 password.
We can test the nc client server functionality by setting a listener e.g. nc -l 1234. In our other terminal / foreground of our current one we can type nc localhost 1234 and then type anything. It will appear in the listening instance of nc.
We can use the netcat (nc) command and some nifty background job tricks to avoid having to open a separate terminal (with screens, tmux or just another tab).
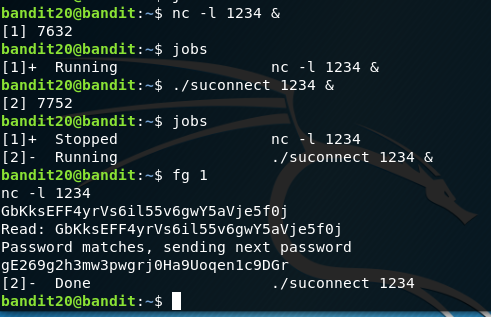
Using the command then & the job will run in the background and then we can just go about our business opening up the job and entering the password and we will get the new pass back. Ctrl+Z stops the job and puts it in the jobs list.
Bandit 21
This time we’re looking at the cron time based job scheduler. If we look at the file in etc/cron.d/ for bandit 22 we can see that the script in the location below runs every minute of every hour of every day etc. as denoted by the 5 stars. If it was more specific it would be different.

We can check out this file in usr/bin.

This script changes permissions on a file in tmp and then puts the pass from bandit 22 into that temporary file. If we go to that file and cat it we will get our password.
Bandit 22
This follows the same format as above. We inspect the cron script, see what it’s running and we see this:
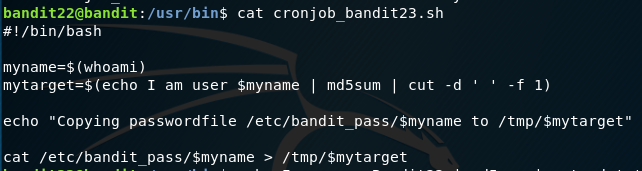
We can see it gets whoami which is currently bandit22 and turns it into a hash and that is the tmp folder name where the password will get placed.
If we think about it, we can just echo our own command replacing $mytarget with bandit23 and see what the tmp folder name is. Sure enough if we cat this we will find the password.

Bandit 23
We have the same cron files as before but for bandit 24. This time the script tells us that it is deleting files in var/spool/*current user*. We can exploit this to get bandit 24’s password.
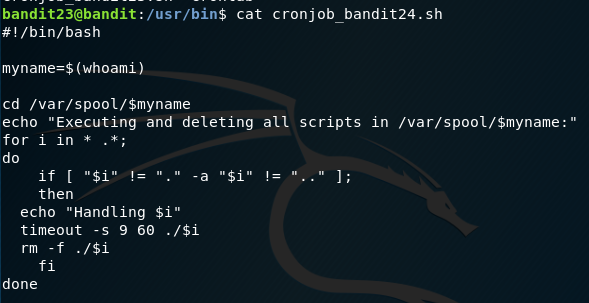
We need to create a script file to put in this folder. We can only make and modify files in /tmp so we make a file here to extract bandit24’s password.

The script is simple enough, grab the password and put it in another file in the same folder as our script.
We can then put the script in var/spool/bandit24 and we would expect in one minute after the cron script runs that we would have the password. But there is a small issue. We need to change permissions on our script file AND our new tmp folder.

This will change our new folder to have full permissions (fine for this exercise) and recursively (-R flag) do the same to our script file. Once this is done, we copy the file over to var/spool/bandit24 and wait for the password to appear in our password.txt file.
Bandit 24
For this challenge we need to use netcat again to connect to localhost on port 30002 to get the next password. The problem is the port requires the password to bandit24 (which we have) and a 4-digit pin. The only way to get this pin is to brute force.
Thus, we must write a script that will automate this process for us to check all 10000 possible pins.
My script looks like so (some help from the internet for cleaner code).
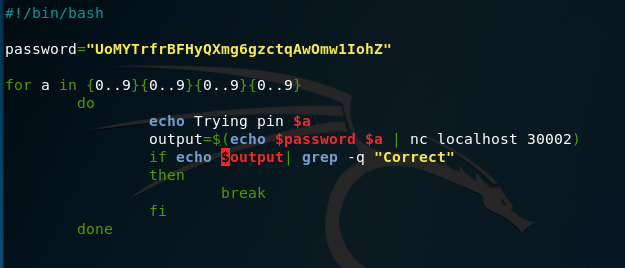
The script will stop on the correct output when it returns correct and then we have our pin.
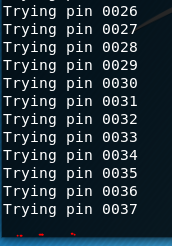
BUT, this is so slow as the script has to go through all 10000 iterations. To be faster, we can prepare all the inputs in a file and then pipe them to the netcat command.
If we write a simple script that will echo the inputs:
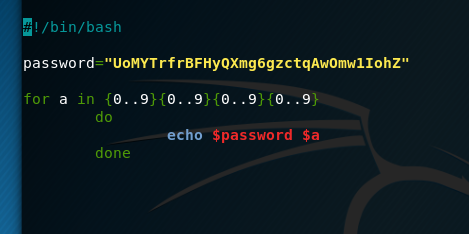
Redirect that output to a new file and pipe that new file to the netcat command while the session is active saving us a lot of time.

And we have our password:

Bandit 25
We need to know a bit about Linux here. Because our shell is not in the usual directory of bin/bash, we have to locate it. All information about the users on pretty much any Linux computer is found in etc/passwd. If we cat this file we can see some useful info:
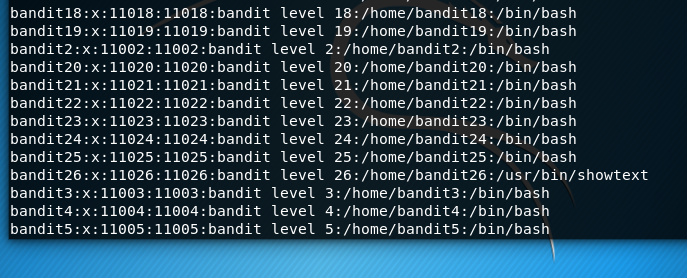
A whole lot of irrelevant information and there, the location to our shell for bandit26.
Our shell is located in usr/bin/showtext. If we have a look at that file with the file command we can see it is a POSIX shell script. If we cat that file we can see it is not bash, but it is still a shell script.
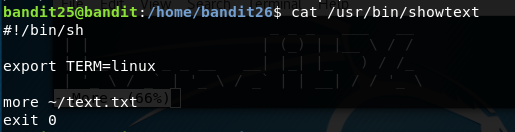
It starts a terminal emulator to Linux and uses the more command to buffer a text file. This text file is the bandit26 banner that we see on logging in before being exited out.
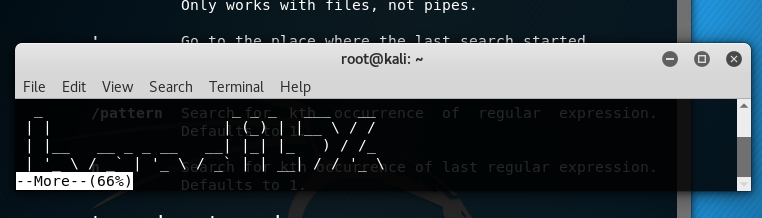
Now that funny thing with more is that it buffers whatever file it’s displaying based on the screen / window size. So in order to access the buffer we just need to create a window small enough so that the text banner cannot print its whole self on the terminal window as you can see here:
So, what next? Well the thing with more is that it can execute commands in a subshell as it is running:
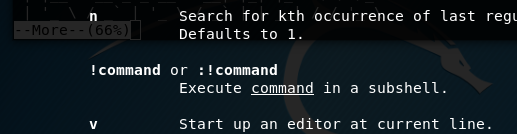
Therefore, we just need to get a small window to access the more buffer and viola, we have a subshell with bandit26 permissions to find our password! But alas, this does not work. Any command will just spit back out our text header. We need to go deeper.
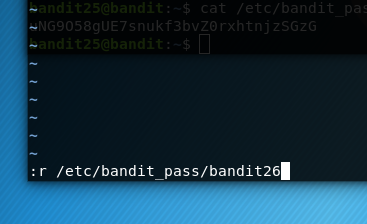
Again, this requires a bit of Linux knowledge to understand. We need to use vim to edit the text file as we can see in the last line of the picture above.
We are on the more page and we press v to get our vim editor. Note the common vim commands: : to get to our options, :wq to save and quit, :q to quit, :q! to force quit. If we type :r we can also read another read only file. So here we want the path to the bandit 26 password file. This is at /etc/bandit_pass/bandit26 like all the other ones.
With this command:
And if we skip through the error message and zoom out our editor:
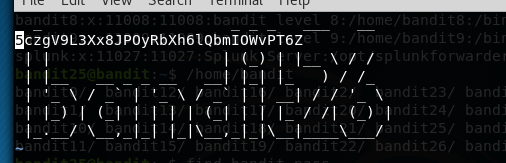
There it is!
Bandit 26
The only thing left is a readme in the bandit26 directory that says thanks for doing the challenges and if you have any ideas, share them.
That’s all the Bandit challenges, if you have any questions, ask away.
Leave a comment